Thursday 30 June 2016

Primark PS... Contour Kit Review

primark ps... contour kit

What the brand says
Contouring is still a hot topic in the beauty sphere and Primark whose beauty range PS... is ever expanding are keen to focus on this.

PS Contour Kit comes with 3 shades to help sculpt and define features for a defined finish.

The lowdown
I did buy this quite a few months ago but I have so much makeup to get through I haven't had a a chance to review it yet!

primark ps... contour kit shadesI've tried a few of Primark's PS... range (see the liquid foundation and lipstick review) and I have found in view of the price the quality of the products are not too bad.

The contour kit has three shades, a light brown for contouring, a dark brown for bronzing and a light beige for highlighting. I like how the kit comes with a little guide on how to contour and there's a clear idea of which shade does what on the back of the box. This is great for any beginners who might not be sure what to do. My first impressions of the highlight are that it seems quite matte and more like a compact powder then a normal highlighter. It comes with a mirror which is great for when you're out on the go and there is a mini brush that comes with it.

primark ps... contour kit shade guide

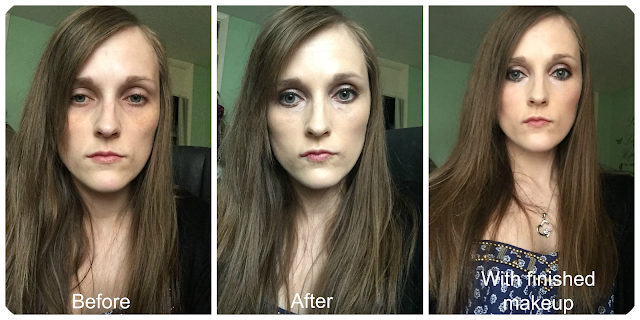
The guide made this really easy to use and I was able to quickly contour my face without having to think too hard about what goes where. the mid brown shade seemed like ti wasn't doing too much at first but then I noticed the colour slowly builds up. The contour kit really helped to warm my skin up especially around my nose and cheeks. I also think it helped to define my features a lot more too. The highlighter shimmer is very light and not what you'd normally expect from a highlighter. If you prefer a more natural highlight you might like this but if you don't it probably won't do much for you.

At £4.00 this is a real budget bargain, it's great for beginners as it tells you where you need to contour and has all the tools you'll need including a brush.

Get it at most Primark stores.

I give it 4/5

before and after primark ps... contour kit

Advantages
  • Comes with a brush and a mirror so it's perfect for on the go travelling.
  • Has instructions on how to contour which is perfect for beginners
  • Budget bargain at under £5
Disadvantages
  • The highlighter is really light and doesn't give much of a shimmer
SHARE:

Wednesday 29 June 2016

Top tips on how to prepare for a road trip

what preparation do i need to take before a road trip

As it's now officially Summer (yes I find it hard to believe too) you're probably thinking about your upcoming holiday. If you've decided to skip the beach holiday this year and stay in the UK then it's time for a road trip. It's important when preparing to travel a long distance that you've looked over your car and ensured it's in a good condition. There's nothing worse than breaking down hundreds of miles from home! This guide will give you plenty of great tips to make your road trip as fun and safe as possible.

Check your tyre tread
Before you head off make sure you check your tyres are ok. The legal limit for tread on your tyres is 1.6mm across the central 3/4 of the tread. If yours are lower than this not only could you potentially get points on your license if stopped by the police, your tyres could burst and cause a massive accident. Obviously this will not be a good start to your holiday. Point S is a online tyre retailer that sells a great range of tyres at rock bottom prices. If your tyre tread is too low Point S will guarantee to get you back on the road.

Check your car fluids
It's essential to check the levels of oil, windscreen wiper wash levels, coolant and brake fluid. All of these are vital to the running of the car and avoid unnecessary breakdowns or accidents. I recently learnt the very expensive lesson of not putting enough oil in my car. Needless to say it caused a seized engine - don't do it!

Check your tyre air pressure
Tyres should have a exact air pressure in order to ensure they drive without incident. The right pressure for your tyres is printed in the owner's manual or where the driver door shuts. Make sure you don't exceed the maximum pressure printed on the side of the tyre. Do check your spare tyre as well as you won't get far if you get a flat tyre and the spare is unusable!

Replace your oil
If your oil is due to be changed it's important to do this before a long journey. Old oil can cause sludge and may put stress on the engine potentially causing a breakdown. You'll need to empty out everything when replacing the oil and replace your oil filter.

Check your car's air filter
If your car has a clean supply of air to the engine this will improve how your vehicle performs. Whilst this won't necessarily cause a breakdown it will mean the car will drive smoother.

Give your car a wash
This may seem rather daft but if your car is clean this increases your visibility and chances of seeing obstacles. Also check your wiper blades and replace them if necessary. If your wiper blades are in poor condition this can cause poor visibility if its rains as the wipers will blur the windscreen instead of clearing it.

Make sure your lights are working
Before you head off check all your lights and indicators are working, both front and back. Ask a friend or family member to watch as you try each light to make sure they work. If these fail you won't be able to signal or use your headlights and these can cause accidents. It may be possible the fuse needs replacing so check that before replacing the lights.

Keep a store of emergency equipment
Having a store of emergency equipment is always useful if you happen to breakdown. Aim to have equipment like a phone, spare tyre and emergency tools like flashlight, screwdriver, spanner etc. you may also want to get a reflective warning triangle (mandatory in EU member states), fire extinguisher and medical kit.

I hope these tips help you get prepared for your road trip. Have fun!

*sponsored post

SHARE:

Tuesday 28 June 2016

Lee Stafford Coco Loco Coconut Balm Review


Lee stafford coco loco coconut balm review

What the brand says
If your hair is dry and hard to manage Coco Loco is designed to give it the kiss of life. Coco Loco is a solid balm that melts into a oil to infuse dry hair with the goodness of coconut.

Coco Loco is the new range by Lee Stafford that launched just in time to keep your hair looking tip top over the summer period. There are 6 products in the collection which include:

  • Lee Stafford Coco Loco Coconut spritz £5.99
  • Lee Stafford Coco Loco Blow and Go Genius Lotion £6.99 
  • Lee Stafford Coco Loco Coconut Balm £6.99
  • Lee Stafford coco Loco Conditioner £5.99
  • Lee Stafford Coco Loco Coconut mask £6.99
  • Lee Stafford Coco Loco Shampoo £5.99

The Lowdown
I recently got sent the Coco Loco coconut balm and Coco Loco Coconut spritz (read the review here) to try. I love the smell of coconut and Coco Loco certainly doesn't disappoint. The smell isn't too light but it's not overpowering either. The balm is solid but as soon as you touch it it melts into a liquid form.

Lee stafford coco loco coconut balmI did find it was quite tricky to get product out of the little tin, mainly because of the solid consistency of the balm. Each time I got a small amount of product and had to keep going back for more. I didn't get out as much product as I'd like because of this which was a bit annoying.

The next morning my hair felt easy to manage and style. I did feel my hair initially looked super sleek and shiny, even more so than with the Coco Loco coconut spritz. This streamlined look didn't really last however and by the next day my hair looked a little wayward.

The Coco Loco Coconut balm initially works well in helping to make hair more manageable and look really shiny. I don't really think the effects last longer than a day though which was a bit disappointing.

I give it 3/5

Get it for £6.99 at Boots*
before and after coco loco coconut balm

Advantages
  • Leaves hair looking initially super shiny
  • Hair is fairly easy to manage
  • Lovely smell

Disadvantages 
  • The pot shape makes it's hard to get out much of the product at one time. You do have to keep going back for more product. 
  • Effects don't last that long
*affiliate link
SHARE:

Monday 27 June 2016

The benefits of using honey in beauty


Honey tastes great on toast and is fabulous at making your fairy cakes taste extra sweet. It's not only good for eating, honey is full of goodness that makes it your must have beauty essential. Honey is a natural product created by bees collecting nectar, pollen and resins from flowers. It has lots of nutrients, antioxidants and healing compounds which means it has tons of hair and beauty benefits. Such benefits include the ability to moisturise, fight bacteria and fight the signs of ageing. The best kind of honey is raw honey as it has not yet been heat treated or pasteurised so it has the most goodness. Here's some top tips to get honey incorporated into your  beauty routine.

Honey makes the perfect moisturising mask
Honey naturally draws moisture from the air so is perfect for hydrating and plumping the skin.
Top tip - use one teaspoon of raw honey on clean, dry skin and leave for 15-20 minutes. Rinse off with water.

Cleansing time
It may sound crazy in view of how sticky honey is, but you'll find honey is great for keeping your pores clear. Raw honey has enzymes that can clean the skin and keep the pores bacteria free. The antibacterial properties help to prevent any further bacteria building up and leading to unwanted breakouts.
Top tip - use one tablespoon of raw honey in conjunction with two tablespoons of jojoba oil or coconut oil until the mixture has a spreadable consistency. Apply to clean, dry skin and massage in a circular motion. After a few minutes rinse the product off with water.

Exfoliate the gentle way
Honey as you know is full of antioxidants, enzymes and other useful nutrients that skin loves. Baking soda is a very gentle powder that also works as a natural exfoliator to help remove dead skin cells. Top tip - Mix two tablespoons of honey and 1 tablespoon of baking soda together to create a exfoliator that will remove dead skin cells. Rub on your face in a circular motion then wash off.

Zap those spots
Spots love bacteria and as a lot of bacteria is naturally found on the face that's why some people suffer from a lot of spots or acne. The antibacterial properties in raw honey can help to reduce the amount of bacteria on your face reducing the amount of breakouts you  may suffer from. It's also great as a anti-inflammatory and will help to reduce irritation and calm redness.
Top tip - apply a bit of raw honey to your worst affected areas, leave for 15 minutes then wash off.

Reduce annoying scars
Amongst its other benefits honey has been used to help lighten skin. The anti-inflammatory properties and antibacterial compounds work to help decrease the appearance of scars and increase the rate the skin regenerates itself.
Top tip - mix one teaspoon of raw honey with one teaspoon of coconut oil or olive oil. Apply to the affected area and rub in a circular motion for one to two minutes. Place a hot washcloth over the area and leave until its cool. Repeat daily for the best results. The two ingredients together will help to revive skin cells and regenerate cell recovery.

Bath time
Honey will also work as a bath aid to repair skin and protect it from environmental damage.
Top tip - mix two tablespoons of raw honey with one cup of hot water and leave until it's dissolved. Once the mixture is integrated add into your bath and enjoy.

Honey is great for hair conditioning
There's nothing worse than hair that lacks shine. Honey is great for use as a conditioner as the enzymes and nutrients in raw honey can give dull hair a gorgeous glossy shine without being too heavy.
Top tip - use one tablespoon of raw honey with two tablespoons of coconut oil to give hair shine and hydration. Aim for the bottom two thirds of hair and avoid the roots.

Take care of your cuticles
As honey is great for drawing moisture it's perfect for massaging into your nail cuticles. The nutrients and enzymes will help to nourish the skin and heal any problems.
Top tip - mix one teaspoon of honey with one teaspoon of apple cider vinegar and one teaspoon of coconut oil. Rub over each cuticle and leave for five to ten minutes before rinsing off. Coconut oil conditions and protects skin, acetic acid in apple cider softens hardened skin and balances PH for healthy growth.

Use honey as a shampoo booster
Honey is perfect to use in your shampoo as it draws moisture and helps to retain it. It's also been known to strengthen hair follicles to ensure healthy growth.
Top tip - mix one teaspoon of honey with a 2p size of your favourite shampoo.

Care for sunburned skin
Honey is fabulous for adding moisture so is great to help aid healing when your skin is red and raw from excess sun exposure.
Top tip - mix raw honey with aloe vera gel for a cooling solution that will aid the healing process. The anti-inflammatories in the honey will calm the redness whilst the aloe vera will cool the skin.

Budget hair highlighter
Don't waste all your money on expensive hair highlighters when honey can do it for next to nothing. There is a enzyme in honey called glucose oxidase that slowly releases hydrogen peroxide which as I'm sure you know is commonly used to lighten hair colour.
Top tip - mix three tablespoons of honey with two tablespoons of water. Apply to clean, damp hair, leave for a hour then rise. Apply weekly for the bet results.
SHARE:

Friday 24 June 2016

Lee Stafford Coco Loco Coconut Spritz

Lee stafford coco loco hair milk

What the brand says
Just in time for Summer comes Coco Loco a innovative hair product by Lee Stafford that transforms straw like hair into silky locks.

The Lowdown
There's nothing Lee Stafford does better then leave your hair smelling amazing. Coco Loco has a gorgeous light coconut smell that really reminds me of Summer. The smell doesn't seem at all artificial and lasts for ages.

It aims to detangle, refresh and revitalise frazzled hair leaving it feeling soft with fabulous shine. The product is a hair milk but has all the benefits of a hair oil without the heaviness. Whilst my hair isn't in the worst condition I do think it's looking a little dull at the moment.

To use I sprayed the product all over the lengths of my hair avoiding the roots. I then brushed the product through and blowdried my hair. My hair was left feeling silky soft and it seemed a lot easier to style with my hair looking straighter at the end. I can't say my hair looked any shinier than normal but it was nicer to work with.

Coco Loco is a lovely hair product that really helps to tame hair and leaves it smelling great.

I give it 3/5

Available for £5.99 at Boots*

Advantages

  • Smells amazing
  • Leaves hair feeling silky soft
  • Hair is easier to manage and seems to hold style better
Disadvantages
  • I don't think my hair looked any glossier than normal
*affiliate link
SHARE:

Thursday 23 June 2016

How to make your hair look thicker

tips on making your hair look thicker

When it seems like everyone but you has gorgeous, thick flowing locks it can feel like you were last in the line when God was handing out good hair. If your hair is fine or lacklustre there's no need to be so hard on yourself, it's very likely, that those women with great hair probably had to do a lot to get there. Just like makeup can enhance your features there's a lot of tricks you can do to enhance your hair. Here's 9 top tips to get you going.

Pick the right shampoo
When choosing the shampoo you're going to use opt for a product that is designed to stimulate the follicles on your scalp. This will help your roots to look bigger so your hair looks thicker. You can also massage your scalp which helps blood flow to the area which promotes better hair growth.

Condition carefully
There are some hair products that can weigh your hair down making it look flatter, this can include hair conditioners. If the conditioner is designed to 'hydrate' or 'smooth' your hair chances are it will have a lot of oils in that will prevent added volume.

Start a blow drying routine
Blow Drying your hair upside down is probably one of the oldest trick in the book to get added volume. First apply a heat protector all over your hair, flip your head upside down and start to blow dry with a round brush. Once your hair is drier flip your head up and finish the rest of your hair in sections.  Use a diffuser to give your hair a volumised look and avoid it going flat.

Lets go old school
It's not just for 50's housewives you know, velcro rollers are great for adding extra volume. Once you've blow dried your hair clip the rollers in and leave for 20 minutes. After the time is up take the rollers out and lightly brush out the curl. You should have fabulous 50's glamorous curls.

Help your roots reach for the sky
Tease the roots and add a small amount of root lifter to help the roots stay up. Don't use too much product or it'll have the opposite effect and weigh it down.

Don't forget the hairspray
Once you've added a bit of volume to your hair add hairspray to fix the look. Aim to use a hairspray that can thicken or volumise fine hair.

Adding layers
By asking your hairdresser to add layers into your hair you're giving the illusion that it's thicker then it is.

Keep brushing to a minimal
If you're always brushing your hair you find you're constantly stimulating your hair follicles which adds unnecessary oil. This can lead to the hair becoming heavier and it will look flatter.

Avoid too much hair washing
There's really no need to wash your hair everyday. Hair is very unlikely to go greasy after a day of not being washed, and even if it did you can use dry shampoo. This will also give you more time to spend doing other things you enjoy like watching a bit of telly.

Are there any tips you use to volumise your hair? Do let me know!
SHARE:

Wednesday 22 June 2016

BD Trade Secrets Radiant Bronze Dream Shimmer highlighter review

bd trade secrets radiant bronze dream shimmer highlighter review
The Tesco Barbara Daly range was revamped around a year ago into BD Trade Secrets. The revamp gave the collection a whole new streamlined modern look. Part of the new range includes BD Trade Secrets Radiant Bronze Dream Shimmer highlighter. I've mainly used highlights with champagne/gold shimmer so this colourful multi dimensional highlighter certainly gave me something new to work with. Check out the video review below.

Available in bigger Tesco stores.

SHARE:

Tuesday 21 June 2016

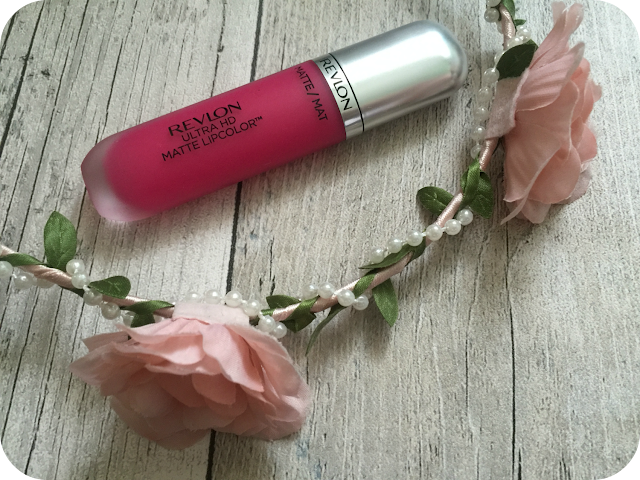
Revlon Ultra HD Matte Lip Colour in Obsession


Revlon ultra hd matte lip colour in obsession

What the brand says
The new collection of Revlon Ultra HD Matte lip colours transform the way you experience lip colour with their unique 100% wax free gel technology.

Unlike a lot of traditional lipsticks that are formulated with wax, this wax free formula is lightweight and helps to leave lips feeling moisturised.

The Lowdown
I've tried a few lip products recently that have started to move away from the typical wax formulation but still provide fantastic colour. These include Makeup Revolution Lip Lava in Firestorm and L'Oreal Sexy Balm in Never Stop.
revlon ultra hd matte lip colour obsession review
The collection is available in 7 shades that are themed around Love with names like Passion, Obsession, Devotion and of course Love. The majority of shades are quite girly with a lot of focus on the pinker side of the colour spectrum.

For the purposes of the review I am testing the gorgeous bright pink shade Obsession. The consistency of the formula is quite gloopy but it's not too overbearing. You apply it with a long wand like you would get with a lip gloss. It has an amazing smell and as soon as you open it you get a strong whiff of Mango and Vanilla.

The product is a lovely bright pink although I'm not quite sure it really suits my skin colour. It dries matte quite quickly and it doesn't feel drying. It's not the most long lasting of lip colours and disappears within a couple of hours. Eating and drinking whilst wearing it is a no go as the colour comes off even quicker.

Revlon Ultra HD Matte lip colour is really easy to wear and feels great. I don't think Obsession is really my colour but who's to say what the other shades would looked like on.

I give it 3/5

Get it for £8.99 at Superdrug*
before and after revlon ultra hd matte lip colour obsession

Advantages

  • Smells so fruity it's delicious
  • Dries matte quite quickly
  • Doesn't feel drying

Disadvantages

  • Limited range of colours that may seem quite restrictive to some
  • The longevity of the lipcolour is quite short and even shorter if eating and drinking.

*affiliate link
SHARE:

Monday 20 June 2016

My favourite TV programmes

my favourite tv programmes

There's so many television shows I'm totally loving at the moment, so much so it's heart wrenching when they end. Here's a few shows I'm addicted to at the moment.

Peaky Blinders
I heard a lot of talk about this show at work but thought it was the show Penny Dreadful with Josh Hartnett in so I wasn't too interested. A few weeks ago I found it on Netflix and didn't look back. Set in 1920's Birmingham you follow the Shelby family, a group of gangsters known as the 'Peaky Blinders'. The family are violent, out for money and getting to the top. Ultimately what wins you over is that they're extremely family focused and you certainly found yourself warming to the characters. The acting is impeccable and the accents are so perfect, especially Tommy's Shelby, which is surprising considering the man playing him is Irish. Each series is dressed perfectly for the setting and whilst each series has the same premise of Tommy and family trying to beat a different enemy it's still really addictive. I also find Cillian Murphy strangely attractive in the show, although in real life I wouldn't look twice! The BBC have just commissioned a further two series too which is fantastic.

Bates Motel
Another Netflix original. Set as a prequel to the film Hitchcock you follow Norman Bates as him and his mother open up their motel on the hill. It's a little slow at first but the story soon unravels and you get a deep insight into Norman's perverted psyche. Norman really does believe his mother is watching his every move and he loves her so much it has disastrous consequences for many around him. Totally gripping and disturbing at the same time. There is also some fabulous eye candy with Norman's brother Dylan.

Pretty Little Liars
June brings the seventh and final season of Pretty Little Liars and I can't wait. If you're not aware of it Pretty Little Liars is about 4 friends who believe their friend is murdered in the first series. As the series develops they start to get disturbing messages from a person called A who is after them. Over time they begin to think A is the person who killed their friend and wants to kill them too. A is a enemy that appears throughout the serieses in different forms and you get a number of baddie reveals, some of which are surprising. I do think the storyline is being dragged out a little, but each trick and message A sends is so disturbing and perverse you can't help but watch to find out who is 'A'. The final A better be good!

Scream
When I first saw this I thought it had something to do with the 1996 film by Wes Craven. Whilst Scream does have Ghostface heavily featured, it's actually a series following a number of teens who of course get slashed and killed over the course of episodes. I'm not the biggest fan of slash and dash movies/programs but this series is a little different. It has quite a bit of suspense and is quite clever about masking who the killer is until the end. It also drops a few hints about one of the characters who is more involved then you may have believed. Series 2 has started on Netflix now and I'm interested to see how it plays out.

What's your favourite TV program at the moment? Do you like any of my favourites? I'd love to hear your thoughts.
SHARE:

Friday 17 June 2016

Dior Poison Girl Review

Dior poison girl review

What the brand says
The most iconic perfume to make waves in the beauty industry now has a sexy little sister to up the anti - Dior Poison Girl. The perfume is both delicious yet toxic and is perfect for the modern girl. It's currently available in 30ml, 50ml and 100ml sizes.

The Lowdown
Originally Dior Poison was said to be so sensual it was banned in some French restaurants when it was first released. With some perfumes spin offs can be quite different sometimes but I was hoping it would still smell sensual and enchanting.

I have tried a few Dior perfumes in the past but I've always felt they were really strong and not my cup of tea at all. I'm more of a sweet/fruity/floral kind of girl and the traditional Dior perfumes in my opinion don't hit those notes. Dior Poison Girl has been taken down a completely different path to the other perfumes in the Dior collection. It's very sensual but a lot lighter and sweeter.

Dior Poison Girl is a mixture of scents with bittersweet floral, notes of orange, Venezuelan Tonka Bean and Grasse Rose. Whilst you may not have heard of some of these rather strange sounding ingredients, I can assure you together they smell pretty amazing!

I tested the 30ml which was £45. You might think it would have been more worth getting the larger version but with over 40 perfumes I doubt I'll be getting through it anytime soon!

The perfume lasted a few hours but not all day which may be a problem for some, especially as the perfume is on the more expensive side.

Have you tried Dior Poison Girl? If so what did you think of it?

Get 30ml for £45 at Selfridges here*

Advantages

  • A Dior perfume that is not too strong 
  • Delightful mix of floral and fruity notes

Disadvantages

  • Only lasts a few hours before fading away
  • Quite pricey

*affiliate link
SHARE:

Thursday 16 June 2016

Tips on how to get festival ready


festival preparation tips

Festival season is almost here and it's time to party!

Whether you're heading to Wireless, Reading, V-fest or Glastonbury it's important to get festival ready. Knowing what the British weather is like you should think practical and leave the 5 inch heels for the next time you're out clubbing. There's nothing worse than dragging 6 inch heels out of sopping wet mud after all! Get your neon paint on and start the countdown with these top tips.

Keep your hair low maintenance
When you're at a festival the last thing you want is to spend a hour perfecting your hair just for the rain (you know what the British weather is like) to downpour and ruin it. It's also a little hard to curl and straighten without electricity. The best option for your hair is something simple and easy to create. Half up styles are perfect as you still have some hair down but the worst of it will stay out of your eyes. You can finish the look with a pretty flower crown. Don't forget your dry shampoo to stop your hair getting greasy. I recommend Superdrug Gold shimmer dry shampoo (RRP £1.99) which you can get here.*

What should you wear?
I've already mentioned that high heels are probably best left at home when you're heading to festival land. Here's a few top picks you should pack into your weekend bag:

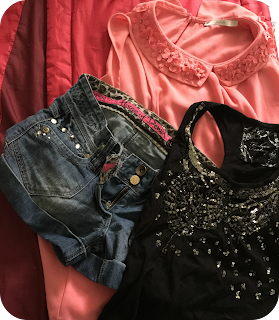
what sort of clothing should i wear to a festival
  • Vest tops or t shirts - so easy to wear and really comfortable.
  • Shorts/skirts - As unpredictable as the weather is generally summer is pretty warm so you'll want to be packing some shorts and skirts. Try to avoid clothing that is too tight or you may end up chafing and sweating when you can't get to a shower easily is not fun.
  • Leggings - so comfortable and so easy to wear. You can throw them on with anything.
  • Sandals - Sandals are great for giving your toes freedom and letting them flirt with the grass. 
  • Boots/trainers - I would definitely carry a pair of wellington boots with you just in case the field turns into a muddy swimming pool (remember what happened at Glastonbury). Trainers are also great for the evening when you're dancing the night away to your favourite bands. 
  • Hat - A lovely straw hat looks cool and is also very practical helping the sun to stay out of your eyes and preventing burning.
  • Cross body bag - aim for a bag that lets you hang it diagonally across your body. This leaves your arms free to boogie. It will also let you see your bag at all times avoiding theft. 

Top beauty tips
When you're going away to dance all day and night and sleep in a tent then you'll know preparation is key. With thousands of people in one field, there'll be massive queues for the showers so you can't freshen up when you feel the urge. Here's some key things to remember:

    festival beauty tips
  • Before you go away make time to exfoliate, shave, pluck anything that needs defuzzing and apply your fake tan. You'll look and feel much better if you know you can get your legs out without worrying about someone noticing your hairy legs!
  • There are showers at festivals but of course you might have to wait a while to get your turn. If you're planning to use the shower pack travel minis to save space and bring a deodorant that you know really works. There's nothing worse then smelly pits on a hot day!
  • Protection from the sun is vital on those hot sunny days. Festivals are completely out in the open so you're exposed from day to night. Even when it's raining the sun's rays can still harm your skin. Bring a high factor suncream - aim for at least SPF 35 to avoid unnecessary sunburn.
  • As you won't be able to wash much you'll want to stay clean in other ways. Bring things like face wipes, hand sanitizer, tissues and baby wipes to get rid of makeup, dirt and grime.
  • When it comes to makeup I would say go for multi-purpose products all the way. With all the stuff you're going to need to take you're going to have limited space for makeup so taking your entire makeup bag probably isn't wise. Aim for the essentials like mascara, foundation, blusher, bronzer, highlighter and eyeshadow. There are fantastic multi purpose products out there - I love Benefit Rockitude Lip and cheek palette (£25.50 at John Lewis), Benefit How To Look The Best at Everything (£25.50 at John Lewis) and Benefit Most Glamorous Nudes Ever Eyeshadow Set (£23.50 at House of Fraser)*
  • Don't forget a lovely bright lipstick to finish your look off.

Have fun at the festivals this summer and stay safe!

*affiliate links
SHARE:

Wednesday 15 June 2016

L'Oreal Sexy Balm Video Review


The new range of L'Oreal Sexy Balm's are a whole new lip experience. You get amazing colour with the soft, caring benefits of a balm. It's win win and definitely worth trying. Have a look at my video and see what you think!

Grab it for £4.99 at Asos
SHARE:

Tuesday 14 June 2016

Colgate Max White Expert White Whitening Pen Review

colgate max white whitening pen results

It's been a long time coming and I apologise for the delay but I can now reveal the results of the Colgate Max White Expert White whitening pen. For more information read my first impressions here.

When I was first offered the opportunity to try the gel I was really excited. Colgate is a major player in the dental industry and I imagine they probably put a lot of research and man hours into the formulation of the product.

Unlike a lot of other whitening products, the pen was easy to store, really easy to use and with a pleasant minty taste it tasted amazing for a whitening product. There was also no residue and no drool, which i'm sure you'd agree is one of the worst side effects of a lot of tooth whitening products.

The pen says you can use it for two weeks or till the pen runs out and I decided to try and use it to the end. Unfortunately that's where I started to become forgetful and kept forgetting to use it and take pictures of the before and after. Hence the late review. So I'm basing my results on the two weeks that I put my full dedication into the review.

I found when I was using the pen my teeth definitely seemed brighter. I did notice however,  my teeth seemed whiter at the start of the test then they were later on which didn't make much sense. This may be due to the light I'm not quite sure. Once I stopped using the pen my teeth went back to their normal shade of off white.

The Colgate Max White pen definitely brightens teeth and whitens them to a extent but the change disappears after use. It's non invasive, tastes great and is a reasonable price so for a whitening product you can't go wrong as long as you're willing to maintain the upkeep.

I give it 4/5

Available for £11.99 at Boots*

Advantages

  • Tastes great
  • Easy to store
  • Does brighten teeth
  • Reasonable price
  • No gloop and no mess
  • Comes with a handy toothbrush

Disadvantages

  • Once you stop using it the whitening effect disappears
*affiliate link


SHARE:

Monday 13 June 2016

How to apply makeup when wearing contact lenses

tips on applying makeup whilst wearing contact lenses

Contact lenses are perfect as an alternative to glasses, but they can sometimes be a massive challenge when it comes to applying makeup. Whilst you've probably found many articles dedicated to applying makeup whilst wearing glasses, tips for those who prefer contact lenses on how to wear makeup are not so readily available. With makeup there are no guarantees, and if you get mascara or eyeshadow in your eye that could mean game over for the contact lenses you'd just applied.

Don't forget to wash your hands
I can't stress how important it is to wash your hands before putting a contact lens near your eyes. Contact lenses can be contaminated just as easily as you could contaminate your food if you eat with dirty hands. Give your hands a thorough wash then make sure they're fully dry before applying your lens as water can transfer potentially dangerous parasites into your eyes. Once your hands are washed and dry apply your contact lenses. It's important to apply your lenses before makeup so the most stressful part is done and out of the way.

If it's oily-avoid
You probably want to avoid the oily look, but you'll be surprised as to how many products actually contain oil. Oils found in some creams and eyeshadows are able to work their way through the contours of your skin into your eyes. As your eyes are naturally watery any oil will naturally head towards your lens causing it to cloud over. The cloudiness isn't damaging to the eye but I'm sure you'd agree it is very annoying.

Take it easy on the tight lining
The very edge of your eyelid, where the tips of your eyelashes hit your eyeball is where your oil glands are located. If you apply a lot of makeup on this area, for example if you tightline a lot, this can lead to you blocking the glands which leads to dry irritated eyes. The best idea is to keep that part of your eye au naturale, especially if you want to keep wearing lenses.

Become a mascara snob
The chances of liking a mascara that leaves your lashes looking clumped is probably pretty slim. However if you know how it feels to get flakes of mascara in your eyes when you're not wearing contact lenses, multiply that feeling of irritation by five when you are. Bits of the mascara may become trapped under the lens leading for a very uncomfortable experience. The worst offender has to be fibre lash mascaras as they are pretty much guaranteed to transmit loose fibres into your eyes!

Invest in dailies
They may be more expensive but daily lenses can actually be a godsend for your eyes. If you wear the same lens on a regular basis and it becomes contaminated you are putting the same bacteria into your eye every single day. Daily contact lenses are more expensive but at the end of the day your eyes stay clean and you avoid the chances of getting nasty ailments like conjunctivitis.

Cleanliness is next to godliness
If you can't afford to wear dailies then the next best idea is to opt for a cleaning routine for your lenses. Make sure you cleanse the lens every night with multi purpose lens solution and remove any grime that has coated them during the day. Ensure you always use fresh solution to leave them in to avoid cross contamination. When storing your contact lenses in a case make sure you thoroughly clean that too as often this is forgotten and can lead to eye infections.

Don't forget to remove all of your makeup!
When you're getting ready to go to sleep please, please don't forget to take your makeup off! Not only is leaving your makeup on bad for your skin but if you wear a lot of eye makeup this is terrible for your eyes as your eyes can easily get irritated.

I hope you find this post useful and that you gain some useful tips when wearing makeup with your contact lenses. Do let me know how you got on!

*this is a sponsored post
SHARE:

Friday 10 June 2016

Laura Geller Baked Gelato Swirl Blusher in Rosewater Review

Laura geller baked gelato blusher in Rosewater review

What the brand says
Laura Geller Baked Gelato swirl is a cream to powder blusher that helps you to wear bright colours by using a translucentt base. Guaranteed to leave skin looking fresh and healthy.

The Lowdown
When I first saw this I actually thought it was a highlighter. I was a little confused by the description which claims the blusher to be a frozen Baked Gelato treat as clearly this has no relation to ice cream. I would say though the swirl design does remind me of the ripples you can get in fresh ice cream. Rosewater is a really bright vivacious pink that has flecks of glitter running through it. On first impressions I would've said it was a powder blusher as it had that kind of solid consistency. The packaging is fun and flirty with cute lipstick kisses inside.

The blusher does feel a little 'dry' and is quite hard to blend into the skin. When I had finished applying the blusher I had quite a natural glow that wasn't too intense. Whilst it does look really pigmented in the pan, this intensity doesn't transfer over to the application.

Laura Geller Gelato blusher is great if you want something that looks quite natural. As it's a little hard to apply it's not great if you want to apply your makeup quick and get out the door.

I give it 3/5

Get it for £21 at House of Fraser
before and after laura geller baked gelato blusher in rosewater

Advantages

  • Gives a natural look

Disadvantages

  • Feels a bit dry
  • Hard to blend into the skin easily
SHARE:

Thursday 9 June 2016

How to successfully edit your blog posts

Blog posts editing tips

When I edit my blog I tend to use a tried and tested formula that works for me. I  use Blogger, one of the most user friendly and easy to use blogger platforms to edit my posts. In this article I'll go into a bit more detail about how I put my posts together.
How i come up with blog post ideas

Getting my thoughts together
Before I put my posts on Blogger I tend to write everything down on Notepad. It helps me to put all my thoughts together and I can come back to it as I please over the week. I tend to write all my posts for the week over a period of days and write them a week before they're due to be published. When I move the content over to Blogger I have an extra chance to spell check and make sure no bloopers get through.
how to edit your blog pictures
how to increase the chances of your blog showing up in google

Editing my photos
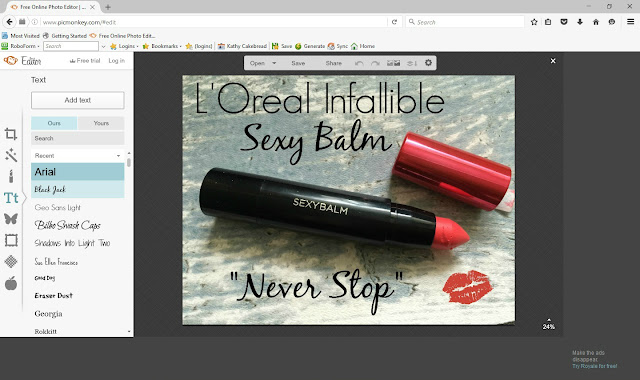
On every post I ensure that I incorporate at least one photo to enrich it. Blogger allows you to edit the size of the photo (you can choose small, medium and large) and move it around till it suits your post. I use Picmonkey to edit all my photos to make sure they're fully optimised before I upload them. Picmonkey is fantastic as it's free and you can do so much, from adding text and overlays to brightening your images. I always rename my photo to what the image is about as it's more likely to appear in Google Image searches. Once I have uploaded the photo into the blog I click on properties and add a title to the two text boxes. This is known as alt tags and again helps the post to show up in search engines.

how to embed youtube videos into your blog post
tips on embedding youtube videos into your blog post

Adding videos
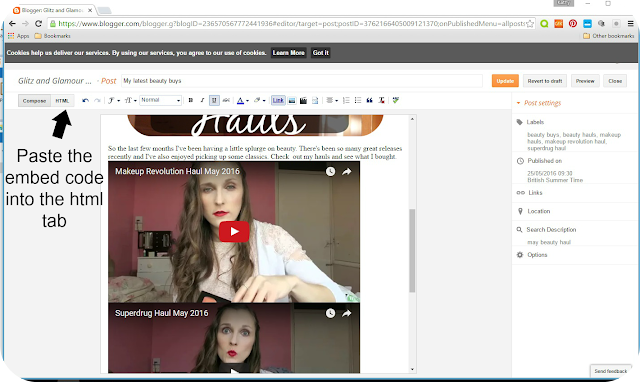
In some of my posts I add videos from Youtube or my computer if I've got something to showcase. You can add videos direct to Blogger which is fine if it's short, but if it's longer I would recommend using Youtube to embed the videos into the post. It's so easy to do, simply go to the share option in Youtube, find the embed code and paste into the html section of your post. This can be done in less then five minutes.

how to schedule blog posts

Scheduling
I post blogs a week in advance so the scheduling button is my friend! With this tool I can schedule a post to appear whenever I want it to. This way your blog will still get updated even if you're busy elsewhere.

how to increase your blog visibility on google

Search description
To get this box you need to enable metadata on your blog. You can find this on Blogger by going to Settings then under Meta Tags there should be a option to turn it on. Once this is active you can add titles to every post in the search description box. I tend to write titles related to the post so it's more likely to appear in Google or other search engines.

These methods help me keep my blog running smoothly so you have something new to read each week. This way of editing does work and if you're new to blogging you may want to incorporate a few of these into your blogging schedule.
SHARE:

Wednesday 8 June 2016

How to create minnie bowties nail art


simple nail art tutorial

It's been a long time coming but I've finally created a new nail art for you all. This design is called Minnie Bowties and is of course inspired by Minnie Mouse with her red colouring, white polka dots and bows. To create this look follow this simple guide.

To create this look I used:


  • Barry M black nail art pen
  • Barry M white nail art pen
  • Bourjois So Laque in Rose Merveille
  • Rimmel Rita Ora in Glastonberry


Minnie bowties nail art tutorial

How to do it:
1. Get a light pink varnish and paint several layers on your nails till you have full coverage
2. Get a red nail varnish and paint 1/4 of your nail a bit like you would a French Manicure. Repeat for all of your nails.
3. Get a black nail varnish with a line tool or nail art pen and draw thin lines just above the top of the red sections
4. Get your nail art pen (or varnish) and draw the top of a bow. Repeat this on the rest of your nails.
5. Finish off your bows by drawing tails. Repeat for all of your nails
6. Finally get a white nail art pen (or white nail varnish and spotting tool) and draw little polka dots in the red areas. Repeat this for all of your nails.

I hope you enjoyed this post, do let me know if you managed to create this and what you thought of it. If there's any design you'd like me to showcase let me know in the comments below!
SHARE:

Tuesday 7 June 2016

How to find time to blog when you work full time

How to find time to blog when you work full time

When you work full time, finding time to blog can be difficult, especially if you work shifts. With limited time you want a solution that works that doesn't leave you burning the candle at both ends. I work full time and use these techniques to fit my blog around my job.

Scheduling is your friend
Without scheduling I don't think I'd have more than 1 blog post up and running each week! The scheduling feature on Blogger is perfect for allowing you to schedule a post weeks ahead at a time. This allows you to write posts when you have a bit of spare time and schedule it for when you want it to show up. The scheduling feature also works for social networking sites like Facebook and Twitter. I currently use Buffer to schedule tweets weeks ahead. With the free option you can schedule 10 tweets but with the paid plan you can schedule 100 at a time (£72 a year). You can also splurge and go for the business plan if you feel it's really necessary. There are other scheduling tools out there like Hootsuite for example.

Every moments a opportunity
Inspiration is all around you and you can get so many ideas for blogging just being out and about. Keep a note pad with you or use the note pad feature on your phone to note down ideas that come to you when you're on train commuting to work or even when you're at the pub with a friend. You can also use that spare time like on your break or lunch to take pictures or write a few key pointers for your blog if they jump into your mind.

Be realistic
Your main job is going to take up most of your time, especially as you work full time. If you also have a family to look after that means running around after your kids, making dinner and bathtimes which leaves spare time even shorter. If you only have time to write 2 posts a week then write 2 posts. There's no point stressing yourself out and making blogging a chore by trying to fit blogging in when you'd rather be chilling out.

Don't compare yourself to others
If you often find yourself looking at the blogs of those whose blog is their job you may end up getting frustrated. Someone who works on their blog all day has the time to dedicate to it that you don't. You may get there slower than them but the time you spend on your blog is just as valuable.

When you work full time finding time to blog will always be a challenge, but it's fun and it can be so rewarding. Happy blogging!
SHARE:

Monday 6 June 2016

Laura Geller Baked Liquid Radiance Foundation in Fair review

Laura geller baked liquid radiance foundation in fair review

What the brand says
Get skin that looks radiant and glowing with Laura Geller Baked liquid radiance foundation. The unique formulation helps to moisturise skin leaving it looking streak free with a natural finish.

The Lowdown
What I found interesting about the foundation is its description of how the foundation is created. The foundation is created using Almond Oil that is baked in Italy on terracotta tiles to create colour that is weightless yet creamy. I know many brands don't disclose how they make their products so it was certainly quite unusual.

Even though I'm happy with my current Bourjois foundation I'm always happy to chop and change and try new things. As well as boosting radiance the foundation has colour correct pigments to help rectify any blemishes.

The foundation feels so lightweight that it's hard to tell I'm even wearing it. It leaves my skin feeling fresh and it has a nice dewy glow. The finish is quite natural and it doesn't look like i'm wearing foundation. It does conceal my dark circles slightly but they are still slightly visible unfortunately so I have to still use concealer.

The foundation does last a good few hours and is really lovely to wear.

I give it 3/5

Get it for £28 at House of Fraser*
pictures of laura geller liquid radiance foundation on

Advantages
  • Lightweight
  • Leaves skin feeling fresh
  • Leaves a dewy glow
Disadvantages
  • Doesn't completely conceal all blemishes like it implies it would
*affiliate link
SHARE:

Friday 3 June 2016

Makeup Revolution Iconic Blush Bronze & Brighten Smoulder Palette Review


Makeup revolution iconic blush bronze and brighten smoulder palette

What the brand says
Makeup Revolution Iconic Pro blush, bronze and brighten kit has everything you'll possibly need to contour and highlight your skin.

The Lowdown
The palette contains a bronzer, blusher and highlighter and is perfect for applying on the go. It's available in four shades, Flush, Rave, Smoulder and Golden Hot and even comes with a handy mirror.

For the purposes of the review I am testing Smoulder. The blush is a really light baby pink, the bronzer is a tan brown and the highlighter a light champagne shade.

When swatched I found the blusher and the highlighter were quite pigmented, the bronzer was a lot lighter and looked a bit like a eyeshadow.

The pigment in the blusher is quite strong and after one sweep I had a nice rosey glow. I wouldn't apply anymore then that or you'll end up looking too red! The highlighter effect is quite strong and I did get a nice glow on my cheekbones. The bronzer was a little harder to work with but after a few applications I did get a nice warm glow which you can see in the picture.

By the evening the blusher and the bronzer had pretty much disappeared and a small amount of shimmer was all that remained of the highlighter. The palette doesn't last as long as some of the products I've tried but it does last a fair few hours.

At just £4 this palette is amazing value for money. It has a lovely finish that gives a gorgeous warm glow without looking too over the top. It doesn't last forever but it will get you through that lunch date or night out with your friends. However at only £4 can you really quibble?

Get it for £4 at Superdrug*

Advantages

  • Fantastic budget price of just £4
  • Comes with a blusher, bronzer and highlighter in one kit so you don't need to carry lots of different products whilst on the go.
  • Has a handy mirror 
  • The blusher and highlighter are quite pigmented
  • The shades are easy to blend

Disadvantages

  • The bronzer took a little longer then the highlighter and blusher to get the full effect
  • Doesn't last as long as some products

*affiliate link 
SHARE:
Blogger Template Created by pipdig